Wireless
Mobile Lab
 |
We're
trying to "stir" up some great ideas. If you have
any great ideas, feel free to pass them on to us....they
may even find their way onto our page! |
WebQuests
Are
your students bored? Do you feel your students might not be
picking up on the important parts of your lessons? Are you
trying to find a way to incorporate technology into your classroom?
Do you want to develop the collaborative skills of your students?
Maybe WebQuests are your answer!!!
What is a
WebQuest?
Bernie Dodge,
the man responsible for thinking up the WebQuest format, defined
it best when he stated that it was "an inquiry-oriented activity
in which some or all of the information that learners interact with
comes from resources on the Internet...". Simply put,
a WebQuest is an activity in which a student or group of students
evaluates and explores pre-selected Internet resources, in order
to complete a real world task.
The best way
to understand a WebQuest is to see one in action. Here are
some examples of WebQuests:
Put Your School
on the Web
By: Leanne Twidwell
http://www.teachtheteachers.org/projects/LTwidwell/index.htm
Museum Exhibition
By: Kaylene Waite
http://staff.buffalostate.edu/waitekd/WebQuest/
Inside a Computer
WebQuest
By: Joseph Lundin
http://users.adelphia.net/~joecentral/webquest/
Why should I use a WebQuest?
A WebQuest is
an exciting way to get students working together and learning course
material. By having students work on a real world problem,
it motivates them to find a solution. Providing pre-selected
Internet resources, lets the students research relevant information,
instead of spending hours on fruitless Internet searches.
If you have students work in groups, it gives them the collaborative
skills necessary for their future. Best of all it develops
their thinking skills by forcing the students to find a solution
to a problem by exploring and evaluating resources.
Not convinced
yet? Visit
http://www.internet4classrooms.com/why_webquest.htm
How do I create
a WebQuest?
There are five
main sections to a standard WebQuest.
Introduction
In this section you lay the foundation for the rest of your
WebQuest. You should use this section to describe the question
or problem, setup the scenario and engage the student.
Task
This section is where you describe the final product or solution
you expect from the student. The task is what all the student's
work is centered around.
Process
A step by step description of how the student will accomplish
the task. In this section you can assign roles, give the students
resources and guide the student through the quest.
Evaluation
Usually the evaluation is in rubric form and describes the method
in which the student will be assessed during the WebQuest.
Conclusion
The final section which is used to sum up the activity or explain
the concepts in further detail.
These five sections
should be completed and then inserted into a webpage, Microsoft
Word document, or some other electronic delivery method that supports
hyperlinks (clickable text).
For WebQuest
templates visit:
http://webquest.sdsu.edu/LessonTemplate.html
http://www.teach-nology.com/web_tools/web_quest/
http://westford.mec.edu/schools/Blanch/WebQ_Stu.htm
WebQuest Tips
* Don't reinvent
the wheel, there are a lot of free WebQuests available on the Internet.
Before designing your own, see if there is a WebQuest you can use.
You can start your search at: http://webquest.org/
or http://kathyschrock.net/webquests/index.htm
* Provide well
researched resources that students can use to complete their assignment.
Make sure that all your resources are complete and accurate.
For more information about evaluating web sites visit
http://www.evalutech.sreb.org/criteria/web.asp
* Use an engaging
real world problem or scenario that puts students into roles.
This will not only motivate the student, but develop their communication
skills and make the project more important to the students.
One-Computer
Classroom
Only one computer
in your classroom? Don't let it sit in the corner and collect
dust! Pull it out and use some of these ideas to help you
integrate it into your course.
Activities
- Create a learning
center where group of students can use the computer to research
a topic
- Use the computer
as a station in a multiple station arrangement, each station could
have different activities or resources
- Have students
type answers into the computer, graph the results and compare
the data
- Using specialized
software, have students perform virtual experiments
- Make students
print out an Internet resource and use that resource to complete
a task
- Collect data
from an experiment and have students manipulate or graph the data
- Create a survey
or quiz station to review or collect data
Presentation
- Perform a
virtual experiment in front of the class
- Use presentation
software, such as Microsoft PowerPoint
- Take a virtual
field trip or tour a facility online
- Try graphical
organization software such as Inspiration to organize or brainstorm
ideas
- Correct anonymous
student papers in front of class to show common mistakes
- Show pictures
or graphics and annotate important parts (ie: fire investigation
photos)
- Present previously
bookmarked Internet sites in class which supplement your course
- Create an
automatic slideshow for orientations, tours or open houses
- Have students
use presentation software for oral reports
Management
- Keep attendance
or a grade book for your courses (using spreadsheet software like
Microsoft Excel will automate calculations)
- Create a webpage
for your courses, or use a course management software such a Blackboard
- Research course
topics and/or teaching methods to convey the material
- Email your
students, other faculty members or join Internet mailing lists
- Develop documents
and handouts for your class (save paper by delivering them via
electronic means)
Tips
- If you can't
afford a video/data projector for your computer, use cheaper methods
such as a scan converter. A scan
converter can convert the signal from a computer into a format
that will work with a television. Then borrow a television
from your audio visual department.
- Take baby
step, don't try and implement all these ideas at once. Start
with one course and a couple of the above ideas. Evaluate
your implementation and make changes if necessary.
- Don't even
have one computer in your classroom? Ask your technical
staff, let them know what you plan to do with the computer.
If your school doesn't have any spare computers, try applying
for grants. Locally, in Western New York, there is an organization
called Computers
For Children, which supply computers to schools.
Other Resources
Classroom
in a Cart aka Wireless Mobile Lab
Planning on a
new computer laboratory, but don't have dedicated space? Are
you sick of wasting time bringing your students to the lab?
Ever wish your computer lab could be portable? If you answered
yes to any of these questions, maybe a classroom in a cart is for
you!
What
is a Classroom in a Cart?
A classroom in a cart is portable cart of wireless laptops that
are rolled right into the classroom. The laptops are distributed
to students The cart has an wireless access point mounted
to it, which plugs into a network jack. Once the access point
is connected, the laptops can connect to it and get out to the network
and/or Internet.
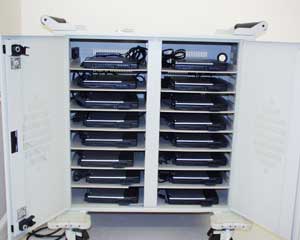
Figure 1: A picture of a classroom in a cart
What
are the advantages?
There are many advantages over a classroom in a cart rather
than a computer lab. Some of these advantages are listed below:
-
No
more dedicating a room for a computer lab, you can now use any
classroom for a computer lab by rolling in the cart and distributing
computers
-
The
computers are wireless and can easily be moved to rearrange
students or furniture to make learning more conducive
-
The
flexibility to bring the computer almost anywhere, for example
into a laboratory during an experiment
-
Laptops
take up less room then desktops, thus enabling students to use
their desk space more efficiently
-
Easy
to store away when the computers are not needed
Any
disadvantages?
Yes there are some disadvantages with using a classroom in the
cart. Some of them are:
-
The
laptops are run on batteries, and those could run out during
class. Plugging them in would be a hassle since the cords
are stored and tied up within the cart to charge up laptops.
-
Depending
on the cart, it may be awkward to roll the large cart down the
hall
-
Laptops
are smaller and easier to steal or walk away with, so security
is a bigger issue
-
All
classrooms would need to have a network wire in order to use
the Internet with the cart
Resources
http://www.scholastic.com/administrator/aprilmay03/articles.asp?article=pointofview
http://www.pc.ibm.com/presentations/us/thinkpad/carte/56/index.html
http://www.apple.com/education/curriculumlabs/faq.html
Home
| Mission | Online
Learning | Concepts | Tutorials
| Online Resources
|