Working with Web Graphics
There are two ways to approach the creation of Web graphics:
- import an image (i.e. scanning photo, photo disk, and saving off the web) or
- create an image from scratch
Importing
an Image
For photographs, most local film developers offer digital processing,
which transforms your old-school pics into digital images stored on a
disc or CD. However, if you plan to take and use a lot of photographs
for your site, you might want to consider buying a digital camera. They
import images directly into your computer, bypassing the need to print
and scan the photo. Plus, most digital cameras offer a preview feature,
which comes in handy when you need to know if the picture turned out okay.
For digitizing printed photos, illustrations, fabrics, and even 3D objects,
nothing compares to the versatility of a scanner. High-end scanners are
great for print projects, but for scanning Web images, most inexpensive
models do just fine. It is also possible to download or save images that
are already on the web; but just make sure that they aren’t copyrighted.
Image Editing
After importing an image into your computer, the next step is to open
the file with one of the many graphic editing software programs available
to you. Adobe's Photoshop has been the professional's choice for years,
but there are cheaper alternatives that will work as well.
Image editing can encompass a wide range of different processes, and in
the following example I'll take you through some of the most common and
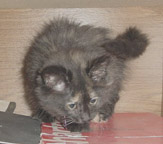
useful graphic edits. For my example, I used a picture of my kitten, Mandy
to illustrate image resizing, color correction, and cutouts. I did everything
with Photoshop, but whatever image editing software you choose to work
with should let you do something similar using comparable commands.
Resizing
Chances are, your imported image isn't the exact size it needs to be for
your site. To resize an image, choose Image Size under the Image menu
and convert the increment setting to pixel for exact resizing. Also, since
monitors only display 72 dpi (Dots Per Inch), any finer resolution is
lost on your computer views, so make sure the Resolution is set to 72.
Once the image has been resized, you may notice a loss of resolution quality.
Unsharp Mask (under Filter > Sharpen) is an invaluable tool for precisely
sharpening an image into focus.
Color Correction
Another thing people often like to do with imported Web graphics is correct
the color. Simple tweaking of the Contrast and/or Saturation (under Image
> Adjust) can enrich even the most washed out photos. For more complex
corrections, the Color Levels feature is helpful, offering both subtle
and extreme color changes.
|
 |
Cropping and Using Transparency
The easiest way to remove a portion of an image is with the Rectangular
Marquee Tool. Simply click and drag the "marching ant" trail
to surround what you want to keep of the image (to make your selection
perfectly square, hold down the shift key as you work), go to Select >
Inverse, then hit Delete. If your cut is more complex, begin by making
a general selection either with the Marquee/Lasso tools or by color range.
The pen tool is better at this – use whatever you feel comfortable
with. If you prefer the transparent background: while the white background
area is still selected, go to Help > Export transparent image. The
only drawback to this is that it must be saved as a gif which isn’t
good at displaying photographic images.
 |
 |
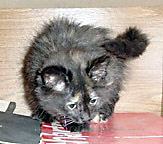
| This image is saved as a jpeg and has a white background that shows if your background is not white. |
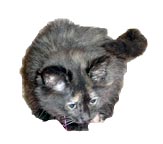
This
image has been saved with a transparent background; but can only
be saved as a gif so some detail is lost. |
That should be enough to get you started, but I encourage you to play around with the many other tools that come with image editors to see what other startling effects you can come up with. That said, editing imported images is only part of the Web graphics game. Occasionally, you have to start with nothing and create an image from scratch.
Creating Original Art
When only original art will do — the creation of a Mandy logo, for
instance — building Web graphics from the ground up is sometimes
necessary. Whether you have a clear plan of what you want to create or
no idea at all, there are a few things to take into account. In the step-by-step
example that follows, I used Adobe Photoshop, but you could also use Macromedia's
Fireworks program or a product like Adobe's
Illustrator.
Getting Started
Under File, select New. A New Document window will pop up with settings
for canvas size and pixel resolution. As I said before, since monitors
display at 72 pixels per inch, Web graphics are limited to that resolution.
Type Casting
As a general rule, you should use HTML to create text on your site whenever
possible — type should only be used in a graphic when absolutely,
aesthetically necessary (logos, banners, etc.). This is because the file
size of graphic type slows the overall page download time, plus extensive
use of graphic type can alienate people with disabilities or old-schoolers
running a text-only browser like Lynx (test your site with Bobby - http://www.cast.org/bobby/
to see how it measures up). Alt text (a description included in an image
tag, such as <img src="mandy.jpg" alt="My Precious Little
Kitty">) can help text based Web surfers better understand graphic
content and navigation.
If you choose to use type in an image, anti-aliasing may become an issue.
Anti-aliasing is an effect that counters the jagged edge of rounded graphics
by blending the pixels along the graphic's edge with the background color.
This blending creates an illusion of smoothness and is usually preferred
in most cases. However, the added colors do increase file size and sometimes
anti-aliasing can blur small type.
Finally, a diverse font collection is paramount, although it's important
to use them sparingly. There are several online resources that offer free
or cheap fonts.
 |
Browser-safe
Colors
The inconsistencies between how different browsers and operating systems
display colors is a nightmarish mess. To make sure images look the same
no matter what a viewer uses to look at them, the limited yet relatively
Web safe palette of 216 colors was born. Double click on the color box
below the menu bar to change the color. Once it opens the color screen,
check the box that says “only web colors” in the bottom left.
 |
Here Comes
the Fun!
Once you have a basic design set, the real fun can start. Experiment with
different enhancing features like fills, strokes and effects. Filters,
like those offered in Photoshop, can also provide amazing finishing touches.
The lighting effects are especially nice.
 |
 |
The key is to try
an endless combination of shapes and fonts while remaining mindful of
a few important factors, like the limited color palette.
With your from-scratch and edited graphics complete, you're now ready
to place them on the Web. But before you can export anything, you have
to first decide on which Web file format best suits your image. For this,
you'll need a basic understanding of the nature of computer graphics and
the features that distinguish them.
Bitmaps vs. Vector Images
Bitmap (or raster)
graphics are stored as a series of tiny dots called pixels. Each pixel
is assigned a color, and when they’re viewed all together, they
form the picture. Bitmap graphics can be edited by erasing or changing
the color of individual pixels. There are many different bitmap file formats:
TIFF for print; Photoshop's PSD and BMP; and finally GIF, JPG, and PNG
for the Web.
Unlike bitmaps,
vector graphics are not based on pixel patterns, but instead use mathematical
formulas consisting of lines and curves that make shapes. Vector graphics
are ideal for illustrations, line art, and type. However, with the exception
of Macromedia's Flash and Shockwave formats, most browsers do not support
vector graphics. As a result, vectors have to be converted to bitmap (rasterized)
before being displayed on the Web. Some file formats include: EPS; Illustrators'
AI and WMF; and PICT for the Mac.
The two primary file formats for Web graphics are GIF and JPEG, although
support for PNG is growing. Both GIF and JPEG formats use different methods
of compression and have respective strengths and weaknesses.
GIF's
GIF (Graphic Interchange Format) is the most common Web graphic file format.
GIF compression is 8-bit and has a maximum of 256 colors. As a general
rule, GIFs are better suited for graphics with areas of solid or flat
color such as illustrations and logos. Other advantages to the GIF format
is that it lets you create transparencies, interlacing, and animations.
A transparent GIF allows one color to be set as transparent, usually a
background color. All Web graphics are square or rectangular and transparencies
are a way to create the illusion of irregularly shaped images. Interlaced
images display a rough version of the entire image quickly and then gradually
fill in the details. This affords the viewers a sense of the image before
it fully downloads, a godsend to those with low bandwidths. Animated GIFs
are files that contain multiple images set to display like a slide show.
They work on all major browsers and require no plug-ins.
JPEG/JPG's
The JPEG format (Joint Photographic Experts Group) was especially designed
for images of photographic quality. JPEG compression is 24-bit, which
means files can contain up to 16.7 million colors. As a result, JPEGs
are ideal for photographs, drawings, and any image with complex or subtle
color gradations.
PNG's
PNG (Portable Network Graphic) is largely considered the format of the
future. PNG compression can be 8-bit, 24-bit, or 32-bit, making it the
ideal format for almost any kind of graphic. However, many older browsers
(I.E. 4 and Netscape 4 or older) do not support the format at all, and
some newer versions still have sporadic problems. Despite some well-founded
skepticism, the future still looks somewhat bright for the license free
PNG.
Armed with this basic overview of graphic file formats, we are now ready
to export our images for the Web.
Exporting
Now that your image
has been edited to perfection, it's time to prepare it for online viewing.
Exporting an image mostly involves optimization techniques, GIF transparencies,
and image slicing.
Optimizing a Web graphic file can be tricky. There's a fine line between
reducing file size for faster download speeds and maintaining the integrity
of the image. Most of the major graphic programs like Photoshop, Fireworks
and ImageReady offer a file optimizing toolbar with preview capabilities.
From this toolbar, select a file format. Depending on the type of image,
the format will usually be either a GIF or a JPEG.
For GIFs, experiment with the different color palettes (Adaptive, Web
216, Exact, etc.) to find the best one for your particular image. After
choosing a palette, the next step is to reduce the amount of colors as
much as the image will allow. Once the palette has been reduced, you may
wish to experiment with the level of dithering. Dithering is a process
where unsupported or eliminated colors are simulated by combining different
colors from the existing palette. The result can sometimes be grainy or
noisy, depending on the type of image. For extensive dithering, the adaptive
palette usually produces the best results.
Exporting JPEGs is even easier. The amount of compression is based on
a scale from 1 to 100. The lower the number, the more compressed the file
and the more loss of quality. The compression requirements for each JPEG
image are different, but most can get away with a level between 30 and
70.
Large images that appear on several Web pages and only change slightly
on each page can often be sliced into pieces. By slicing an image, the
consistent pieces are carried over to the next page in the browser's cache.
Only the smaller, swapped portion is downloaded, thus greatly improving
the overall download speed of each page. Image slicing is also sometimes
necessary to accommodate complex HTML designs.
You now have the know-how to import, create, edit, and export impeccable
Web graphics. However, static imagery isn't always enough. In these instances,
graphic rollovers and animated GIFs can help bring a Web page to life;
but that's another lesson.